Showing posts with label Meta Mondays. Show all posts

Wednesday, March 2, 2011

Antique Mirror Makeover Serving Tray ~ And all for under $7

We all love a Makeover, don't we? I know I do!
I found this mirror at a tag/yard sale in CT years ago for $1 - it is a great antique with some missing pieces on the lovely sculpted deeper part of the frame. I knew immediately what I wanted to do with her...
As you can see by the close-up pics, the chips were definitely noticeable, but I had just the idea that would bring this Mirror up to her potential!
The condition of the Mirror itself was in perfect condition...
At one of my favorite antique stores, I found this genuine mink brooch/hair clip (yes, it does both) and decided she had to play a part in the Makeover. Doesn't every lady love a mink brooch?
Using a jeweled metal ponytail holder that had lost it's attachment through frequent use, this was the perfect piece to hot glue to the mirror so I could clip the minkie on, but also take it off when "I" wanted to wear it! This was my favorite part of the entire project...dual use for this luscious clip.
I'm a button and bauble bead collector - so I pulled my tray of goodies out and selected just the right ones that would bring this Mirror Lady to life. Many of the items in this location are not only buttons, but odd earrings that I no longer wear, but have great artistic interest.
A sneak peak at her on the bed after her Makeover was complete - you'll see in the front middle area that I've added a few pheasant feathers that helped to tie in with my hint of animal print that I have as accents in my Master Suite.
I decided to keep the entire stressed look, other than covering the areas that had badly chipped. This reminds me of us ladies that begin to mature, it's part of "who" she is, and it somewhat speaks of where she's come from...
I loved making the earring drape over the outside edge...again adding to her sweet presence and uniqueness.
Another great view...

The pic above allows you to see how the mink clip reflects in the mirror - unfortunately a little dust is showing in this pic that I missed dusting off first. Oh well, I have a bit of dust on me today too... ;)
And, here she is - in her full glory in her new room.
The wine colored pillow on my bed says "I believe in Angels" ~ a great thrift store find right before Christmas. I think this Mirror definitely had her own little Angel to bring her all the way from CT at a tag sale to my home here in GA to live like a Queen with all of her new Jewels & Mink. You can't really see from these pictures, but four smaller knobs are attached to the bottom of the mirror, as every woman needs shoes... Oui? I am on the search for some small crystal door knobs to replace these smaller ones eventually.

I have missed posting these past weeks, life continues to spin so fast...the harder I try to slow it down, the faster it gets. I'm sure many of you can relate!

Hoping to drop by and visit many of you this coming week! I miss you all so much when I'm absent. Happy Spring!
Hugs,
~CC Catherine

Monday, July 12, 2010

~Recycled Creations Inspire me...so I spent the weekend creating!

There's something about gifts & packaging made out of recycled items that I love ~ they are pieces of Art that I adore~they become heirlooms to moi~ It amazes me of the talent my friends Julie & Claudie have. (go visit them, they are both extremely Francois & chic cool ladies)
The card below sits on my mantel to this day and I read it over and over again every time I walk by it. Each meticulous cut and trinket they attached morphed into this delicate and chic with French influence piece of art for me that they gave me their last morning here back in March.
Not only is it beautiful ~ but it wasn't till after they left that I realized (1) of them even bequeathed me a piece of her monogrammed jeweled pin to make it even more of a heartstring gift~The Rhinestone Letter "C" that hangs on the bow.
So, this weekend I was packaging up some trinkets, baubles, and gifts I had been collecting to mail to each of them in Canada, and I couldn't help but wanna return the creativity favor! ( I can't show everything, but this will give you some great ideas ~ and it will give them a sneak preview of some of the features of their cards and wrapping!
This card is made out of a lovely striped cardboard that was on the top of a box of candy or cookies. It was too pretty to throw away, so I kept it for a rainy day. The little friend pups I cut from a card that was given to me from a "PUP" I dog sit. (I can't bear to throw cards away) The coin is new that I bought from Cracker Barrel...and with just the right cut here and there...and doubleside tape for the coin...this is a card for my PINK friend~
Next, I'm gonna show you the whim that came over me when I was ready to wrap some of their packages! All you need for this is what you see above. Something to cut your paper, Takkon strips to make attaching the paper & pics to your boxes/paper. A punch corner cutter, see how pretty & adorned the edges of the paper look above.
And last but not least, a plain small box. (Approximately 8x10 inches)
And don't forget some trim for the side of the box ~ since the box is not going to be wrapped in traditional all over wrap, this will be how you dress up the sides in some cases!
You guessed it right, this is for my Pink friend, we all know who she is and where she lives! She's mad about Audrey, and so I decided to do some photoshopping and quote finding of Audrey's and use that to adorn the package back... (yes, backside) ;)
Side view...
And front view ~Notice the adorable Tiffany diamond ring that I found antiquing in Franklin, NC just last weekend~ It totally gave it the Audrey Hepburn/Breakfast at Tiffany's bauble accent that it needed. All my friend needs to do when she gets this gift is gently remove the ribbon (it's not taped on) then cut two small pieces of tape that is holding the box lid on...remove her gift, and reattach the box lid for her memory box to keep our letters in that we from blog land send her! :)
Since I was wrapping for "two" friends that I adore~ Claudie brought Julie to meet me back in March...and now she's sharing her friendship of Julie with me too. What a gal~ :) Above you'll see that I took two vintage hankies to wrap a small gift for each of them. The floral hankie is tied together with a lace shoelace that I kept throughout the years and never used. I only had one...and it was perfect to tie up the giftwrap~
And, now...for my Vintage friend Julie~ You see, Julie loves everything vintage...and especially clothes, hats, and such~ So, this box was designed and created with her love of design and art...with a bit of vintage recipes that I photocopied from a book that is over 100 years old that belonged to my great great MeMe.
Here are the items that I used to create with...laid out randomly...
Instead of using ribbon that didn't feel vintage to trim the sides of the box...I went with buttons instead...and to keep with the vintage feel...I went with basic blacks, greys, and tortoise shell brown tone buttons and one cream designer flat stone for the front & back side.
The photos I took a couple years back while antiquing and they just had Julie's name written all over them. (back side of box)
And front side of box...Julie loves to wear the color black~and this dress would look Francois & chic on you my darling~ ;) And, no, not done yet... Using some old French newspapers from my visit to Paris & Dijon back in 2001, I photocopied some small sections for more small wraps. Check it out below~
Who would have know that in 2001...when I brought this French Newspaper home that I'd meet two French Canadian friends in 2009/2010, and one of them would be all about Audrey Hepburn...notice the article about Audrey on the paper~ :) Amazing...
The personalized card attached to the copied newspaper wrap was made from a photo that I took in a sweet vintage shop in Franklin, NC called Primrose Lane. The shop owners name is June Hernandez and I'm sure she'd love to sell some of these finger "tipless" fishnet black gloves~ They're on my shopping list for the next time I visit her shop~ I simply added some text to the pic...made a teency hole in the top left to slide a paper flower in it and "voila"...it's my personalized touch that says how much I adore & treasure these two GEMS of friends~
Am I ever gonna be done? Probably not...I spent the entire weekend alone having a blast wrapping their gifts...one more quick idea~ Here is a small pink doily that I found antiquing in Franklin..folded it in half...interwove some pink sheer ribbon along the sides & bottom, slipped in my little gift..and...
attached another little handmade card from a "too pretty to touch" tea set from June's shop that is available for purchase at Primrose Lane (Shope# 828-524-9258). No, I'm not getting commission, I just love small business owners and believe if we don't support them, they'll go away in this economy...so, go to Facebook and search for Primrose Lane and get connected with June~ I'm going to feature here in my next post so you can see "many" of the great items she carries in her precious Vintage & Chic boutique~
And, for my vintage friend...I think I got "p*r*e*t*t*y" creative making this card for you my dear~ Can't wait for you to get it~ And, yes, I was at Caffe REL when the pic was taken for my 28th Wedding Anniversary one week ago~ For anyone in the Franklin, NC area ~ or within driving distance...it's a MUST~
Well friends,
Au Revoir for now...
be back in a few to talk more about Primrose Lane...and how we need to support June so she keeps her doors open! We need to show her how the lovers of vintage & chic rally the troops in Blogland, and believe me, when you see what she has in her shop....she'll need a receptionist to take the phone orders she's going to get~
Since this is Monday, and my friend Susan loves seeing things morph from one thing to the next, thought I'd join her and the group today. Be sure to stop by her place to see more things that morph on Mondays~

Monday, June 8, 2009

Generational Stitches Link Yesterday to Today with Meta Monday & a Blue Monday Auction for you!~

I feel like I'm springing up from a pool to get a breath of fresh air today! I'm back for Meta & Blue Monday....for the first time in a long time~ IT's great to be back!
Thanks to both Susan, from "Between Naps on the Porch" for hosting Meta Monday...I've gotten more projects completed when I participate in Meta Monday...it's inspired me week after week!
And thanks to Sally, from "Smiling Sally", for hosting Blue Monday's. My passion for blue and white is extremely noticeable on my blog, as all of you well know. First up - My before picture of a Pillow Top I recently redid. Both sides of the pillow looked like this:

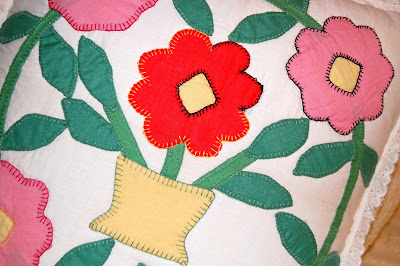
The other side looks like this completed after I stitched it onto the reverse side: The reason why this Pillow Top is so special to me is because my grandmother started it over 60 years ago. She tacked all the color you see on to a muslin square...she then embroidered all the black stitches you see. I found it ten years ago in her possessions and asked her if I could take it and finish it. I purposefully wanted to use embroidery thread colors different than black so that I'd always remember where she stitched. I recently completed this after picking it up and laying it back down the past five years. I love it...here is a close up of the stitches:

Now for my Blue Monday Auction offer...I've recently decided to begin an Auction opportunity to my readers. Today...I'm sharing the following Blue/White favorites from my collection and am auctioning them off.

Items being auctioned:

Two exclusive dish designs that remind you of a Fitz & Floyd look. I have a matching pair of bowls that are a very nice size...each one is glazed so it can be used for food...and a little bunny is on the front of each bowl. (Two of these - 5 inches circular wide at top)

Then, the third piece to the collection is a 12" end to end, with 8" x 4" basket like tray with a bunny on each end. I've used this for serving bread, veggies, potato salad...anything you need to serve looks tremendous in this!

How the Auction will work:

1. I'm starting the auction of all three pieces at only $15.

2. If you decide you'd like to place a bid to purchase these, just leave a comment with your bid amount and your email address on this post.

3. If you are the highest bidder, I will send the payment arrangements to you personally by email. (Shipping and Ins/Handling charges will be applied to the total fee)

4. If for some reason the highest bidder does not end up sending payment, the next highest bidder will be notified to see if you're still interested in the items.

5. This Auction is only open to USA residents due to high cost of shipping out of states, my apologies.

NOTE: If this auction is fun and well received, I plan on doing this frequently.

Happy Monday to everyone~
~CC Catherine
Sunday, May 3, 2009

Chef Claude Peter's Make Over for Meta Monday along with his infamous Strawberry Shortcake Scone Recipe!

Welcome to my Chef Claude Peter Metamorphosis Monday Make Over!
Please be sure to visit my friend, Susan, at "Between Naps On the Porch" to catch all the other super shares!
I found Chef at Abbie's Attic Consignment Shop in Flowery Branch, GA, for just $10. He's made out of Terra Cotta and was originally lightly white washed. He was kinda messed up in a couple places with a little ink, but nothing a can of spray paint wouldn't clear up.
Here he is, going through the paint job! I used a flat white spray paint. He was very well behaved, with the exception of the fumes that bothered him terribly...he did superb! ;)
By Claudie...I think he's all done now! ;)
You'll notice in this shot below that he's now sporting a black bow tie, along with black caps on the buttons of his chefs jacket. I just adore him! I named him "CHEF Claude Peter", after my father(first name) and my youngest son(middle name).
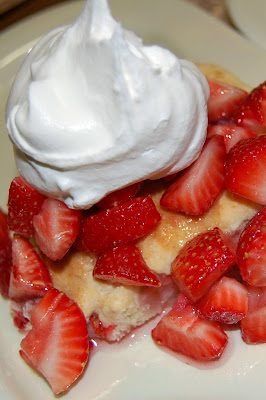
Chef Claude Peter felt like helping me bake tonight...so we whipped up my Strawberry Shortcake Scone recipe. It's a scrumptious scone that can also be used for Strawberry Shortcake, which is what we did tonight! mmmm good! Chef is great to hold a slim vase of flowers like I used him for in last weeks tablescape, or above, you'll see him sporting the napkins for dessert!
Strawberry Scone RECIPE:
1 1/2 cup strawberries hulled and cut into 1/2" pieces
(sprinkle with sugar to bring out juice)
2 1/4 cups flour
3 T. granulate sugar
2 teaspoon baking powder
1/4 tsp. salt
6 Tbl. sweet butter
2/3 cup milk
In large mixing bowl, combine flour, sugar, salt, and baking powder. Cut butter in and work in till size of peas. Stir in strawberries and gently stir to coat, add milk and gently stir again until the dough begins to form. Using your hands, form into a ball out of dough. Then roll out onto a floured board 1/2 thick. Bake till golden brown.
Bake @ 425 Fahrenheit min., or until golden brown.
Always have plenty of extra strawberries for garnishing the shortcake! (Dishes are part of the "LIFE COLLECTION" from DaySpring that are showcased in a previous blog post.) Don't forget if you like the LifeStyle collection by DaySpring, you'll want to check out their website for more details. But, first...check my information out on my blog!
Here is the traditional Strawberry Shortcake!
And my favorite, I take the scone and chunk it up in a bowl, put more strawberries that have been sugared and put milk on all of it! Now, this is GOOD! ;)
Don't forget to enter my Blog Give Away by clicking on the Blog Button below. CLICK on blog button and follow the Give Away guidelines so you can enter! Deadline for entering is Sunday, midnight, PDT. May 10th!
Bon Appetite~
~CC Catherine

Sunday, April 26, 2009

Peace Dove ~ Art Inspires Art

Welcome to Meta Monday...and be sure to drop on over to Susan's @ "Between Naps On The Porch" for more Meta Monday posts!
My husband's Aunt presented him with this hand painted Peace Dove with the Cross this past Christmas. He'd seen it hanging on her wall and fell in love with it. Since she was turning 70 years old on the birthday they share in April, he decided as his first Stained Glass item he'd make all on his own, he'd recreate the art into his own interpretation and present it to her for her 70th Birthday gift.

First, he selected his glass -
Second, he took the photo of the painted art and printed it off on an 8x10 paper and assigned numbers to each piece. He would then need to cut this puzzle like paper and tape it to the glass so it was cut precise.


After cutting each piece of glass, he then used copper to cover the edge of each piece of glass. If you look closely enough in this photo below, you can see the copper edging. After all glass pieces are edged with the copper, it's all put together and push pins are used to keep it in place while he uses the solder gun to apply the solder.
With the solder applied, he attached the chain and it's ready to hang in the window.
This is a close up view! His Aunt fell in love with it!
It was his first attempt, and he's never had any professional lessons; just my daughter showing him a few things. He wants to pursue this in the fall by taking classes.

I'm so proud of his first piece! ;)

Happy Monday~

~CC Catherine